Installing SequeLink® Server on a Windows Server Platform
PREREQUISITE: You must have administrator privileges to install SequeLink Server on a Windows server. See "SequeLink® Server" for database prerequisites.
The SequeLink Server installer on the supported Windows platforms requires the Microsoft Windows Installer service. If the SequeLink Server installer detects that the service is not installed on your machine, or that an older version is installed, a message is displayed. After installing the Microsoft Windows Installer service, you might need to restart your machine. Then, you can install SequeLink Server.
To start the SequeLink Server installer:
- If you have one SequeLink Server installed and you are replacing it, perform the following actions before you start the installer:
- Make sure that the installation directory is empty.
- Check that the %TEMP% directory does not contain SequeLink files such as swandm.ini.
- Kill any SequeLink processes that are still running.
- Make sure that the SequeLink ports have been removed from the etc/services file.
- Use new service names.
- If installing from the DataDirect DVD, insert the DVD into the DVD-ROM drive. If you have a local DVD-ROM drive, this typically is drive D. If the DVD-ROM drive is on a network, mount the DVD and create a mapping to the DVD-ROM drive. Then, perform one of the following actions:
- If AutoRun for DVDs is enabled and you have a browser, the main installer window displays automatically. Select the product that you want to install; then, follow the instructions to install the product.
- If AutoRun for DVDs is not enabled, or you do not have a browser, use Windows Explorer to navigate from the root directory of the DVD to the folder for the product you want to install. Then, double-click setup.exe.
- If installing from files downloaded from the Web, follow the instructions on the DataDirect Technologies Web site to download the appropriate self-extracting ZIP file. Open the contents of the ZIP file into a directory (for example: C:\temp). Then, navigate to the directory containing the unzipped files and double-click setup.exe to start the installer.
NOTE: If you have more than one SequeLink Server installed, call DataDirect Technical Support for instructions on uninstalling the SequeLink Server that you want to replace.
Gathering Information for the Installation
Table 2-1 lists the information that you must supply during installation of all SequeLink Servers on Windows. The table also provides an example of a value for each attribute. Refer to the SequeLink Administrator's Guide for information about SequeLink service attributes.
SequeLink® Server for Informix
Table 2-2 lists the information that you must supply during installation of SequeLink Server for Informix on Windows. The table also provides an example of a value for each attribute.
SequeLink® Server for JDBC Socket
Table 2-3 lists the information that you supply during installation of SequeLink Server for JDBC Socket on Windows. The table also provides an example of a value for each attribute.
SequeLink® Server for ODBC Socket
During installation of SequeLink Server for ODBC Socket on Windows, you can supply a connection string for the backend ODBC driver, for example, DSN=my_backend_ODBC_dsn.
You set this value with the "DataSourceMSSODBCConnStr" service attribute, described in the SequeLink Administrator's Guide.
SequeLink® Server for Oracle
During installation, of SequeLink Server for Oracle on Windows, you must supply the version of the Oracle database. For example, if the data source is version Oracle 10g, you enter 10.
SequeLink® Server for Sybase
During installation of SequeLink Server for Sybase on Windows, you can supply a network address, for example, mySybaseServer;5000.
You set this value with the "DataSourceSybNetworkAddress" service attribute, described in the SequeLink Administrator's Guide.
Installing SequeLink® Server
NOTE: The screen shots in the following procedure show the installation of SequeLink Server for Oracle on a 32-bit Windows server. The installation on a 64-bit Windows server is similar.
- Start the appropriate SequeLink Server installer. When the Welcome window appears, click Next to continue.
- The License Agreement window appears. Accept the license agreement by clicking the I accept the terms of the license agreement option; then, click Next.
- On the License Agreement window, perform one of the following actions:
- The Product Registration window appears, prompting you for product registration information.
- The Custom Setup window appears. Choose your installation options.
- Click one or multiple component icons to select the components to install. When you select a component, a description of the component appears in the Feature Description box.
- To change the installation directory, click Change. A window appears allowing you to browse and select an installation directory.
- A window appears, prompting you for the server names and TCP/IP ports to be used by the SequeLink Server. The SequeLink Agent allows the SequeLink administrator to configure, manage, and monitor this SequeLink Server using the SequeLink Manager.
- SequeLink Server for Oracle on a 32-bit server, continue at Step 7.
- SequeLink Server for Oracle on a 64-bit server, skip to Step 12.
- SequeLink Server for Informix, skip to Step 8.
- SequeLink Server for Sybase, skip to Step 9.
- SequeLink Server for ODBC Socket, skip to Step 10.
- SequeLink Server for JDBC Socket, skip to Step 11.
- SequeLink Server for DB2, skip to Step 12.
- SequeLink Server for SQL Server, skip to Step 12.
- If you are installing SequeLink Server for Oracle on a 32-bit server, the Oracle Version Information window appears, requiring you to select the version of your Oracle database.
- If you are installing SequeLink Server for Informix, the Informix Server Settings window appears, prompting you for information about your Informix installation. See "SequeLink® Server for Informix" for the information you must supply.
- If you are installing SequeLink Server for Sybase, the Sybase Network Address window appears, prompting you for the network address of the Sybase database. See "SequeLink® Server for Sybase" for the information you must supply.
- If you are installing SequeLink Server for ODBC Socket, the ODBC Connect String Information window appears, prompting you for a connection string for the ODBC system data source that connects to this service, for example, DSN=my_backend_ODBC_DSN.
- If you are installing SequeLink Server for JDBC Socket, the JDBC Socket Settings window appears, prompting you for the values for this server.
- Websphere Information Integrator Classic Federation for z/OS (also known as CrossAccess or DB2 II Classic Federation)
- Apache Derby 10 (also known as Cloudscape)
- The Ready to Install the Program window appears, allowing you to go back and review your choices before proceeding. If you are ready to install, click Install.
- The InstallShield Wizard Completed window appears when the installation has been completed successfully. Click Finish.
- Test your SequeLink environment by establishing a connection between the SequeLink Client and the SequeLink Server. For instructions on testing your SequeLink environment, refer to the SequeLink Administrator's Guide.
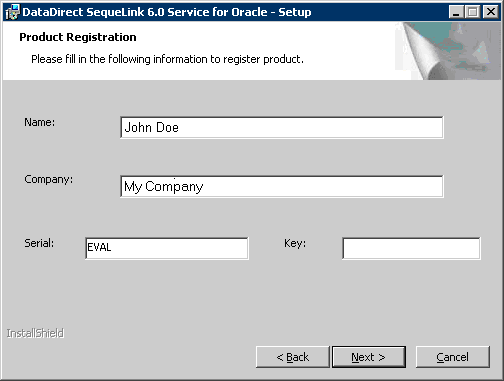
Type your name and your company name in the appropriate fields. Then, perform one of the following actions:
When you are finished, click Next.
If you chose to install an evaluation product, a message appears confirming the length of the evaluation period. Click OK to continue.
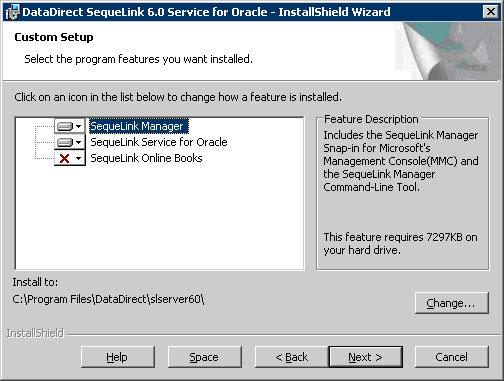
When you are satisfied with your settings, click Next.
NOTE: Multiple SequeLink Servers can be installed on the same machine; however, if you want to install them in the same directory, the SequeLink Servers must be different service types. For example, you can install SequeLink Server for Oracle and SequeLink Server for Microsoft SQL Server in the same directory.
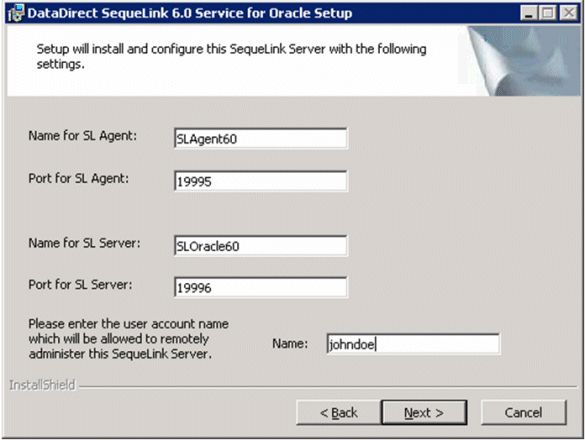
NOTE: The service names and TCP/IP ports must be unique (not used by another service). If you do not specify a unique service name or a unique TCP/IP port, the installation will fail. No software will be installed.
NOTE: If you are installing a different SequeLink Server service type in the same directory as an existing SequeLink Server, the same SequeLink Agent and SequeLink administrator account will be used; you will only be prompted for the service name and TCP/IP port of the SequeLink Server you are installing. Before proceeding, we recommend that you use the SequeLink Manager to stop any running SequeLink services and SequeLink Agent.
If you are installing:
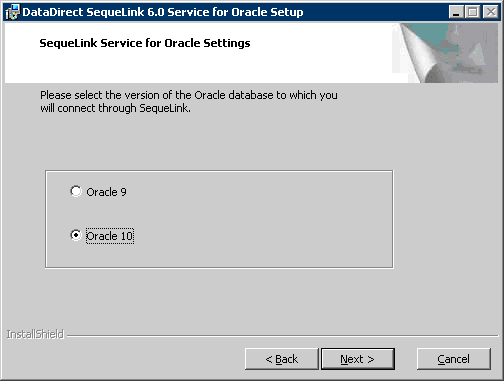
Select the version of your Oracle database (Oracle 9 or Oracle 10) by selecting the appropriate option, and click OK.
NOTE: If you select the incorrect version of Oracle, you will receive an error when you try to start the SequeLink for Oracle service.
Continue with Step 12.
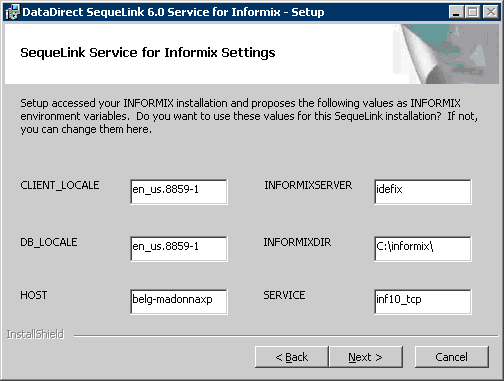
Provide the following Informix information, then click Next:
CLIENT_LOCALE: Type the value of the CLIENTLOCALE environment variable.
DB_LOCALE: Type the value of the DBLOCALE environment variable.
HOST: Type the value of the INFORMIXHOST environment variable.
INFORMIXSERVER: Type the value of the INFORMIXSERVER environment variable.
INFORMIXDIR: Type the value of the INFORMIXDIR environment variable.
SERVICE: Type the value of the SERVICE network parameter.
NOTE: Valid values for the fields on this window can be determined using the Informix tool Setnet32, which can be accessed from the Informix program group.
Continue with Step 12.

Specify the network address of the Sybase database, for example, 10.30.131.2,5000. Then, click Next to continue.
Continue with Step 12.

If you leave this field empty during installation, you must configure the "DataSourceSOCODBCConnStr" service attribute before you can use SequeLink Server for ODBC Socket. For instructions on configuring SequeLink Server for ODBC Socket, refer to the SequeLink Administrator's Guide.
Click Next to continue.
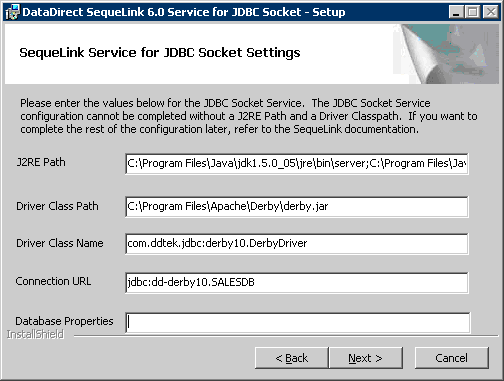
Provide the following information, then click Next:
J2RE Path: Type the name of the directory where the Java Runtime Environment resides, for example, PATH D:\Program Files\java\jdk1.5.0_05\jre\bin\server.
Driver Classpath: Type the classpath that contains all of the JDBC drivers that need to be accessed by the SequeLink Server for JDBC Socket, for example, C:\Program Files\Apache\Derby\derby.jar.
Driver Name: Type the name of the JDBC driver being used to connect to the database. For example, if you are using the Apache derby JDBC driver, the value could be:com.ddtek.jdbc:derby10.DerbyDriver.
Connection URL: Type the URL string to pass to the JDBC driver to connect to the database. For example, if you are using the Apache derby JDBC driver, the value could be:jdbc:dd-derby10.SALESDB.
Database Properties: Optionally, type the name of the properties file. Properties files are supplied in your installation package in the bin/odbc2jdbc/classes/com/ddtek/jniutil directory. The names of the properties files that are shipped with the product are: crossaccess30, db2v7mvs, db2v8udb, derby, oracle817, sqlsrv2000, and sybase125. If you do not find the appropriate properties file for your JDBC driver, contact DataDirect Technologies technical support.
For instructions on selecting the database properties after installation using the SequeLink attributes, refer to the SequeLink Administrator's Guide.
NOTE: If you will be connecting to the SequeLink Server for JDBC Socket with an ADO Client, you must configure the DataSourceProviderTypesFile and DataSourceProviderTypesSection service attributes. See "Completing the ODBC Socket and JDBC Socket Installation for the ADO Client" for instructions on how to configure these attributes. Refer to the SequeLink Administrator's Guide for information about service attributes.
Click Next to continue.
NOTE: For some drivers, SequeLink provides a wrapper driver with its own Driver name and Connection URL. This wrapper driver fixes incorrect JDBC behavior, provides workarounds for driver deficiencies and optimizes code paths. For the following third-party drivers we strongly advise you to use these wrappers:
Driver name: com.ddtek.jdbc.crossaccess30.CrossAccessDriver
Connection hurl: jdbc:dd-crossaccess30:<datasource>:
tcp/<host>/<port>:CODEPAGE=USS
Database Properties: crossaccess30
Driver name: com.ddtek.jdbc.derby10.DerbyDriver
Connection url: jdbc:dd-derby10
Database Properties: derby
If the installer encounters any Windows registration errors, it will not install SequeLink Server and will display a message that tells you to examine the installation log file SLSERVER.LOG (see "Installation Log File"). The installation is rolled back and no software is installed.
NOTE: If the installer has installed the SequeLink Server correctly, but the SequeLink Agent or the SequeLink Data Access service cannot be started, a message box appears:

Click OK. The SequeLink software is correctly installed, but the configuration needs to be corrected in order to start the services. Refer to the SequeLink Troubleshooting Guide and Reference for more information about starting SequeLink services and using the troubleshooting tools for SequeLink Server.
Silent Installations
The SequeLink Server installer provides a command-line option for silent installations on Windows servers. For example, if you want to install a licensed copy of the SequeLink Server for SQL Server in an installation directory named \Program Files\DataDirect\SequeLink\SQL_Server, you would use the following command:
setup /s /v"NAME=\"John Doe\" COMPANY=\"My Company\" SERIAL=123456789012
KEY=12345678 INSTALLDIR=\"C:\Program Files\DataDirect\SequeLink\
SQL_Server\\" SLACCOUNTNAME=DDTEK\susank /qn /l*v C:\temp\SLSERVER.LOG"
Silent installations are useful for system administrators who want to create a batch file to execute multiple identical installations of SequeLink Server.
To install SequeLink Server silently:
- Using a command-line, change to the directory containing the SETUP.EXE file for the SequeLink Server you want to install, or ensure that this directory is on your path. Type the command:
- The installation proceeds without any further user intervention or notification. You must consult the log that is created during the installation (see "Installation Log File") to determine whether the installation was successful and, if it failed, why it failed. Have this log available if you contact DataDirect Technologies for technical support.
setup /s /v"arguments /qn /l*v path\log"
See "Command-Line Syntax" for an explanation of the syntax rules. See Table 2-4 for an explanation of each command-line parameter. See Table 2-5 and Table 2-6 for an explanation of the arguments that follow the /v parameter.
To uninstall SequeLink Server silently:
NOTE: Make sure that the SequeLink service is stopped before uninstalling.
Using a command line, change to the directory containing the SETUP.EXE file for the SequeLink Server you want to uninstall, or ensure that this directory is on your path. Type the command:
Then, press ENTER. The SequeLink Server is removed without requiring any further interaction.
Command-Line Syntax
In general, there must be a space between all command-line parameters and between each argument. The exception is that there cannot be a space between /v and the double quotation mark that follows it. Multiple arguments and parameters can be specified between the opening and closing double quotation marks, but each one must be separated by a space. The arguments are case-sensitive.
IMPORTANT: When any of the command-line parameters include an item that contains a space, that item must be preceded and followed by the escape character \". For example:
and
Parameters and Arguments
Table 2-4 describes each command-line parameter. See Table 2-5 and Table 2-6 for the required and optional arguments that follow the /v parameter. All arguments are case-sensitive.
Table 2-5 lists the required arguments that follow the /v parameter. Arguments that are required for all SequeLink services are listed first, followed by required arguments that are service-specific. All arguments are case-sensitive. See Table 2-6 for optional arguments.
|
Argument
|
Description
|
|---|---|
|
All SequeLink Servers
|
|
|
COMPANY=company name
|
Provide your company name. If your company name includes spaces, the name must be preceded and followed by the escape character \".
|
|
INSTALLDIR=installation directory
|
Provide the directory name where you want to install SequeLink Server.
If this path contains spaces, you must use escape characters, as explained in "Command-Line Syntax".
|
|
KEY=key value|\"\"
|
Provide the license key for your purchased product or type
KEY= \"\" to install an evaluation product.
|
|
NAME=user name
|
Provide your name. If your user name includes spaces, the name must be preceded and followed by the escape character \".
|
|
REMOVE =ALL
|
Provide to uninstall SequeLink Server.
|
|
SERIAL=serial number value
|
Provide the serial number for your purchased product or enter
EVAL to install an evaluation product.
|
|
SLACCOUNTNAME=Administrator user ID
|
Provide the user ID of the person who is authorized to administer the SequeLink Server.
|
|
Informix (see note)
|
|
|
CLIENTLOCALE=clientlocale
|
Provide the value of the CLIENTLOCALE environment variable.
|
|
DBLOCALE=dblocale
|
Provide the value of the DBLOCALE environment variable.
|
|
HOST=host
|
Provide the value of the INFORMIXHOST environment variable.
|
|
INFORMIXDIR=informixdir
|
Provide the value of the INFORMIXDIR environment variable.
|
|
INFORMIXSERVER=informixserver
|
Provide the value of the INFORMIXSERVER environment variable.
|
|
INFORMIXSERVICE=informixservice
|
Provide the value of the SERVICE network parameter.
|
|
NOTE: Valid values for Informix-specific arguments can be determined using the Informix tool Setnet32, which can be accessed from the Informix program group.
|
|
|
Oracle
|
|
|
ORACLE_HOME
|
/rdbms/oracle10g
|
|
ORACLE_SID
|
Provide the Oracle System Identifier that refers to the instance of the Oracle database running on the server. The default value is ORCL.
|
|
SERVICE=
SL6_Oracle90 | SL6_Oracle10
|
Provide your Oracle version (applies to 32-bit machines only).
|
|
Sybase
|
|
|
NETWORK ADDRESS=Sybase network address
|
Provide the network address of the Sybase database.
|
|
SequeLink Server for JDBC Socket
|
|
|
JREPath=J2RE PATH
|
Provide the path where the virtual machine resides.
|
|
DRIVERCLASSPATH=Classpath
|
Type the classpath that contains all of the JDBC drivers that need to be accessed by the SequeLink Server for JDBC Socket, for example,
C:\Program Files\Apache\Derby\derby.jar.
|
|
DRIVERCLASSNAME=Driver Name
|
Type the name of the JDBC driver being used to connect to the database. For example, if you are using the Apache derby JDBC driver, the value could be:
com.ddtek.jdbc:derby10.DerbyDriver.
|
|
CONNECTIONURL=Connection URL
|
Provide the URL string to pass to the JDBC driver to connect to the database. For example, if you are using the Apache derby JDBC driver, the value could be:
jdbc:dd-derby10.SALESDB.
|
Table 2-6 lists the optional arguments that follow the /v parameter. Arguments that are optional for all SequeLink services are listed first, followed by optional arguments that are service-specific. All arguments are case-sensitive.
Installation Log File
If you encounter any problems during the installation, you can find details about the problem in the installation log file.
For SequeLink Server installations using the standard installation procedure as described in "Installing SequeLink® Server", the SequeLink Server creates a SLSERVER.LOG file in your temporary directory (for example, C:\temp).
For silent installations as described in "Silent Installations", you must specify the path of the location of the log file and the log file name as described in "Command-Line Syntax".
The log file created during the installation can be read with a text editor or word processor. DataDirect Technologies provides technical support to help you interpret the log file if you encounter problems.
Although the log file can be very long, the most important information is at the beginning and end. For example, for silent installations, the initial lines reproduce all the command-line arguments that you entered. The final lines of the log file indicate whether the installation was successful. If a failure occurred, examine the command-line entries to see if the syntax is correct.
Integrating SequeLink® Monitoring with Windows Performance Monitoring
If you are integrating SequeLink monitoring with the Windows Performance Monitoring tool on the Windows platforms on which the SequeLink Server runs, you must explicitly set the required counters in the Windows registry. When the SequeLink Server installation finishes, the files SWEVPERF.INI and SWEVPERF.H appear in your temporary directory (for example, C:\temp). For instructions on integrating SequeLink monitoring with Windows performance monitoring, refer to the SequeLink Administrator's Guide.
Uninstalling SequeLink® Server
NOTE: Make sure all SequeLink services are stopped before uninstalling SequeLink Server. For instructions on stopping a SequeLink service, refer to the SequeLink Administrator's Guide.
On all Windows platforms, the Remove option of the product Setup deletes product files and entries in the system information.
You should use the Remove option if you have a SequeLink Server installed and want to install the same SequeLink Server in a different location. Remove the installed SequeLink Server; then, reinstall the SequeLink Server in the new location.
To remove your installation:
- After opening Add/Remove Programs, select the DataDirect program and, depending on your platform, click Remove or Add/Remove. Clicking Remove immediately removes the program. Clicking Add/Remove displays the DataDirect Setup Welcome window. Click Next to display the Program Maintenance window.
- Select Remove; then, click Next. The Remove the Program window appears.
- Click Remove.
- On the Setup Completed window, click Finish.