Note: For a 64-bit machine, when you install a 64-bit OpenAccess SDK 8.1 Client for ODBC, the shortcut for the ODBC Administrator points to the 64-bit version. When you install a 32-bit OpenAccess SDK 8.1 Client for ODBC, the shortcut for the ODBC Administrator points to the 32-bit version.
For a 32-bit machine, the shortcut for the ODBC Administrator points to the 32-bit version.
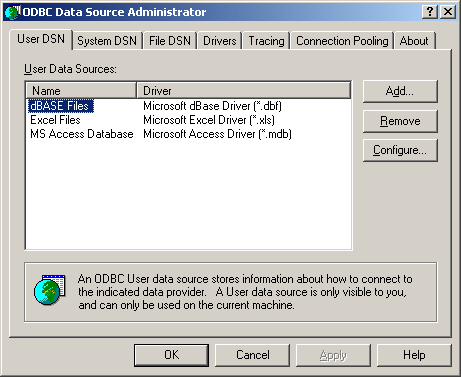
2. Click the User DSN tab or the System DSN tab to list user or system data sources, respectively.
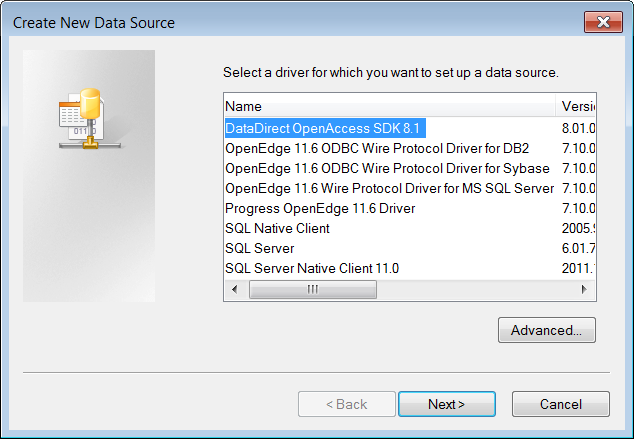
To configure a new data source, click the Add button. The Create New Data Source window appears. Continue at Step 3.
To change an existing data source, select the data source you want to configure and click the Configure button.
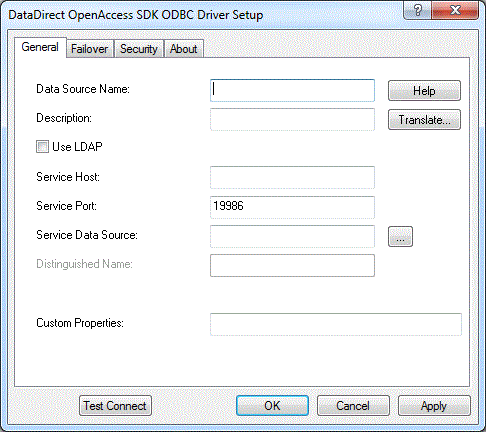
The DataDirect OpenAccess SDK ODBC Driver Setup window appears.
4. On the General tab, provide the following information; then, click Apply.
Data Source Name: Type a unique name that identifies this ODBC data source configuration. Examples are Accounting or OpenAccess to Accounting Data.
Description: Optionally, type a description of the data source, for example, My Accounting Database.
Service Host: Type the host name where the OpenAccess SDK service runs.
Service Port: Type the TCP/IP port the OpenAccess SDK service is listening on for connection requests. The default value is 19986.
Service Data Source: Type the name of the data source configured for the OpenAccess SDK service to use for the connection, or click the ... button to select an existing data source. This field is optional. If a server data source is not specified, the default data source for that service is used.
Use LDAP: To configure the ODBC Client to retrieve connection information from an LDAP directory, select the Use LDAP check box. The fields change on the lower half of the screen to accommodate the information required to query an LDAP server for connection information. Provide the following information:
LDAP Server Host: Type the TCP/IP host name of the LDAP server.
LDAP Server Port: Type the TCP/IP port the LDAP server is listening on for connection requests.
Distinguished Name (DN): Type an identifier that uniquely identifies the LDAP entry where the connection information is stored.
Custom Properties: Type a custom property and value specific to your data source. The ODBC Client passes the value to the IP layer. You can enter up to 16383 characters.
Refer to the OpenAccess SDK Client Reference for information about using custom properties.
Note: An ODBC client data source can reference an LDAP directory to retrieve server connection information. See Retrieving Connection Information from LDAP Directories for more information about retrieving connection information from LDAP directories.
Note: SSL encryption is not supported for LDAP Servers. The Use LDAP and the Encrypted (SSL) check boxes are mutually exclusive.
Translate: Click Translate to display the Select Translator dialog box, which lists the translators specified in the ODBC Translators section of the Registry.
Select a translator; then, click OK to close this dialog box and perform the translation.
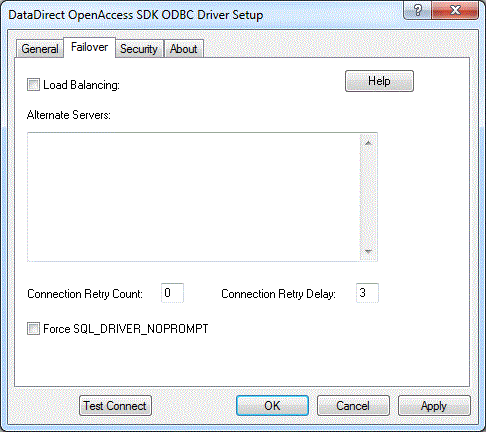
5. Optionally, click the Failover tab to specify Failover data source settings.
Provide any of the following information; then, click Apply.
Load Balancing: Select this check box to allow the ODBC Client to use client load balancing in its attempts to connect to primary and alternate database servers. In this case, the ODBC Client attempts to connect to the database servers in random order.
If this check box is not selected (the default), client load balancing is not used and the ODBC Client connects to each database server based on its sequential order (primary server first, then, alternate servers in the order they are specified).
Note: This option has no effect unless alternate servers are defined for the Alternate Servers connection option.
The Load Balancing option is an optional setting that you can use in conjunction with connection failover. See Configuring Connection Failover for the ODBC Client for a discussion of connection failover and for information about other connection options that you can set for this feature.
Alternate Servers: Type a list of alternate OpenAccess SDK Servers to which the ODBC Client will try to connect if the primary OpenAccess SDK Server is unavailable, using a string that defines the physical location of each alternate server. Specifying a value for this option enables connection failover for the driver. See Configuring Connection Failover for the ODBC Client for a discussion of connection failover.
Important: If you specified an LDAP server in the LDAP Server Host field, the alternate servers must be LDAP servers.
The server name and port are required for each alternate server entry. All of the other required connection information for each alternate server is the same as what is defined for the primary server connection. Currently, the only optional property that can be set for the alternate server is Server Data Source.
Connection Retry Count: Type a value to specify the number of times the driver tries to connect to the primary server and, if configured, to the alternate servers after the initial unsuccessful attempt.
Valid values are integers from 0 to 65535. When set to 0 (the default), the ODBC Client does not try to connect after the initial unsuccessful attempt.
If a connection is not established during the retry attempts, the ODBC Client returns an error that is generated by the first server to which it tried to connect.
This option and the Connection Retry Delay connection option, which specifies the wait interval between attempts, can be used in conjunction with connection failover.
Connection Retry Delay: Type a value to specify the number of seconds that the ODBC Client waits after the initial unsuccessful connection attempt before retrying a connection to the primary server and, if specified, to the alternate servers.
Valid values are integers from 0 to 65535. The default value is 3 (seconds). When set to 0, there is no delay between retries.
Note: This option has no effect unless the Connection Retry Count connection option is set to an integer value greater than 0.
This option and the Connection Retry Count connection option, which specifies the number of times the ODBC Client tries to connect after the initial unsuccessful attempt, are used in conjunction with connection failover.
Force SQL_DRIVER_NOPROMPT: Select this check box when connection failover or load balancing is enabled. This check box must be also selected if the application cannot change the DriverCompletion argument to SQL_DRIVER_NOPROMPT.
If this check box is not selected (the default), the behavior of the application is not changed.
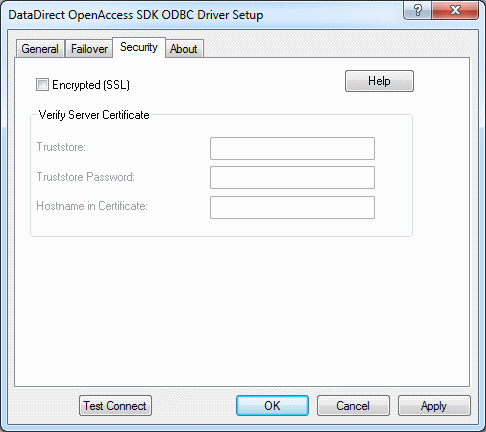
6. Optionally, click the Security tab to specify security data source settings.
Provide any of the following information; then, click Apply.
Encrypted (SSL): If the remote OpenAccess SDK service is configured for Secure Sockets Layer (SSL) encryption, select this check box. If connecting to a service enabled for SSL, you must select this check box.
When the check box is cleared (the default), communication between the OpenAccess SDK Client and OpenAccess SDK Server is not encrypted, and the Verify Server Certificate fields are disabled.
Configuration of encryption is performed on the OpenAccess SDK Server. See Using SSL Encryption for a discussion of encrypting data.
Truststore: If you are using SSL, type the path that specifies the location of the truststore file in pkcs12 format or a comma-separated list of valid Certificate Authorities (CAs). The truststore file contains a list of the valid CAs that are trusted by the client machine for SSL server authentication. If the connection string does not provide a TruststorePassword, the Truststore setting is assumed to be a comma-separated list of valid CAs, for example, "C:\cacerts\myca1.cer,C:\cacerts\myca2.cer".
Truststore Password: If you are using SSL, type the password required to access the truststore.
Host Name In Certificate: If you are using SSL, type the host name established by the SSL administrator for the driver to validate the host name contained in the certificate. If no value is specified for Host Name In Certificate, the driver does not check the host name in the server certificate. The value of Host Name In Certificate is ignored if the Encrypted (SSL) check box is not selected.
7. At any point during the configuration process, you can click Test Connect to attempt to connect to the data source using the connection properties specified in the driver Setup dialog box. A logon dialog box appears; see Testing ODBC Connections on Windows for details.
Note that the information you enter in the logon dialog box during a test connect is not saved.
If the driver can connect, it releases the connection and displays a Connection Established message. Click OK.
If the driver cannot connect because of an improper environment or incorrect connection value, it displays an appropriate error message. Click OK.
Note: If you are configuring alternate servers for use with the connection failover feature, be aware that the Test Connect button tests only the primary server, not the alternate servers.
8. Click OK or Cancel. If you click OK, the values you have specified become the defaults when you connect to the data source. You can change these defaults by using this procedure to reconfigure your data source. You can override these defaults by connecting to the data source using a connection string with alternate values.